Did you know we form first impressions almost instantly? We usually think about this when meeting people, but the same thing happens with brands, often through a logo.
Whether you’re launching a startup, rebranding a side project, or exploring design for the first time, a logo plays a major role in how people connect with what you’re creating.
Logo design is a valuable skill, but it can feel intimidating.
Even as an award-winning designer with over a decade of experience in branding, that moment of “where do I start?” never really goes away.
The good news is that logo design is more accessible than ever. By mastering the fundamentals, anyone can learn how to design a logo that feels intentional, professional, and true to their brand.
In this guide, I’ll walk you through all the logo design basics, from understanding brand identity design, typography, and color schemes to creating scalable vector designs that work in the real world.
Understanding Logo Design Basics
I’ll be honest, my first logo design was bad, like clipart-level bad. I’m embarrassed to even show it here because you’d probably lose all faith in my credibility.
Logo design isn’t about making something look cool. It’s about psychology, purpose, and understanding who you’re designing for.
How Visual Elements Work
The human brain processes visual information far faster than text, meaning people can form an emotional response and a first impression of a brand within seconds.
That may sound obvious, but staring at a blank canvas has a way of making you forget it.
- Color plays a major role in emotional perception. Blue signals trust and stability, common in tech and banking, while red conveys energy and urgency, often used in food and retail.
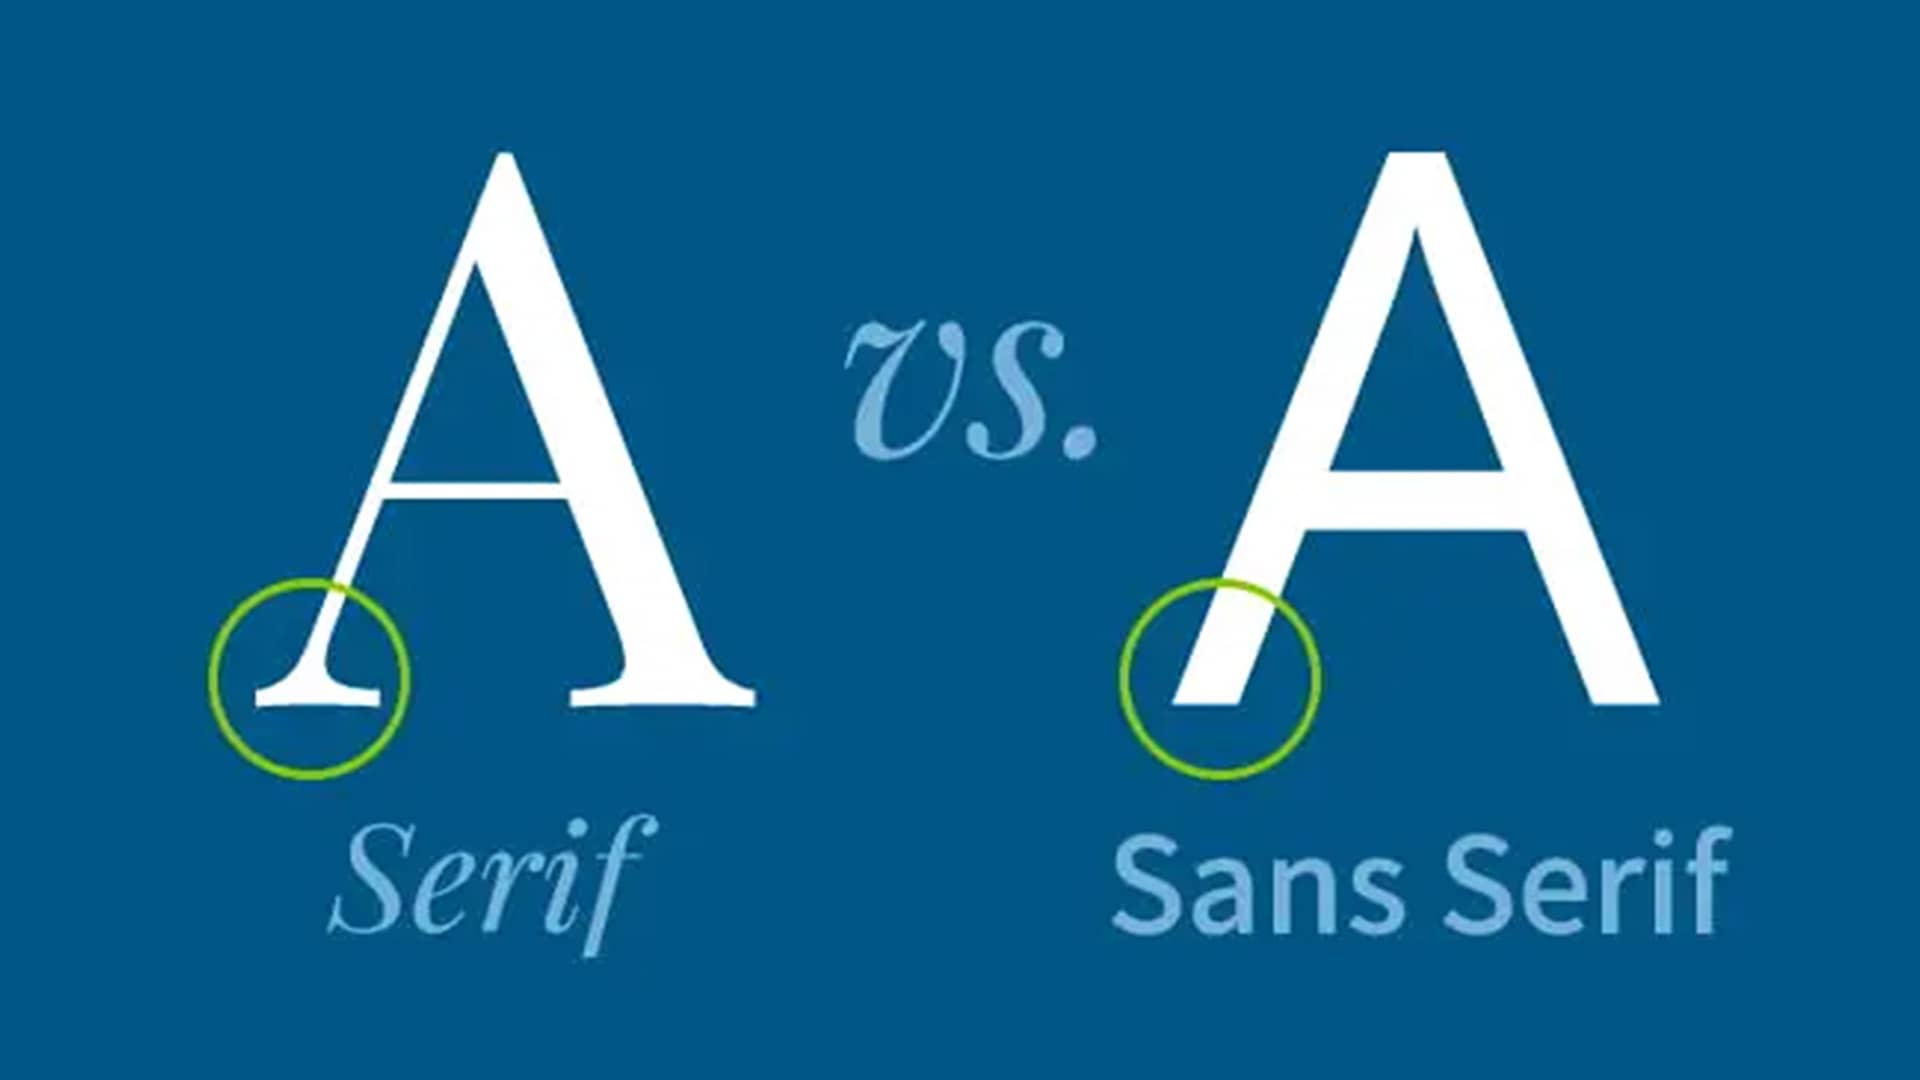
- Typography adds perception. Serif typefaces feel established and reliable, making them suitable for institutions, while sans-serif typefaces appear cleaner and more modern for digital products.
- Shape influences meaning. Circles and curves feel friendly, sharp angles suggest strength, squares communicate stability, and triangles imply direction and movement.
Logos don’t just communicate what a brand says; they communicate how it feels.
Why Scalability Matters
A strong logo works across all types of media, from business cards and billboards to social media, packaging, and more. If it’s not recognizable while squinting your eyes, it’s probably too complex.
Scalable logo design isn’t just about size; it’s about consistency. The same logo might appear on a massive trade show banner one day and a phone screen the next.
Simple geometry survives both, which is why the Nike swoosh works at any scale.
Exploring Different Types of Logos
I used to think a logo was just a logo, something you design to slap on a product and call it a day.
That assumption didn’t last long, as I later learned how each logo type serves a different purpose and that choosing the wrong one can limit a brand’s functions.
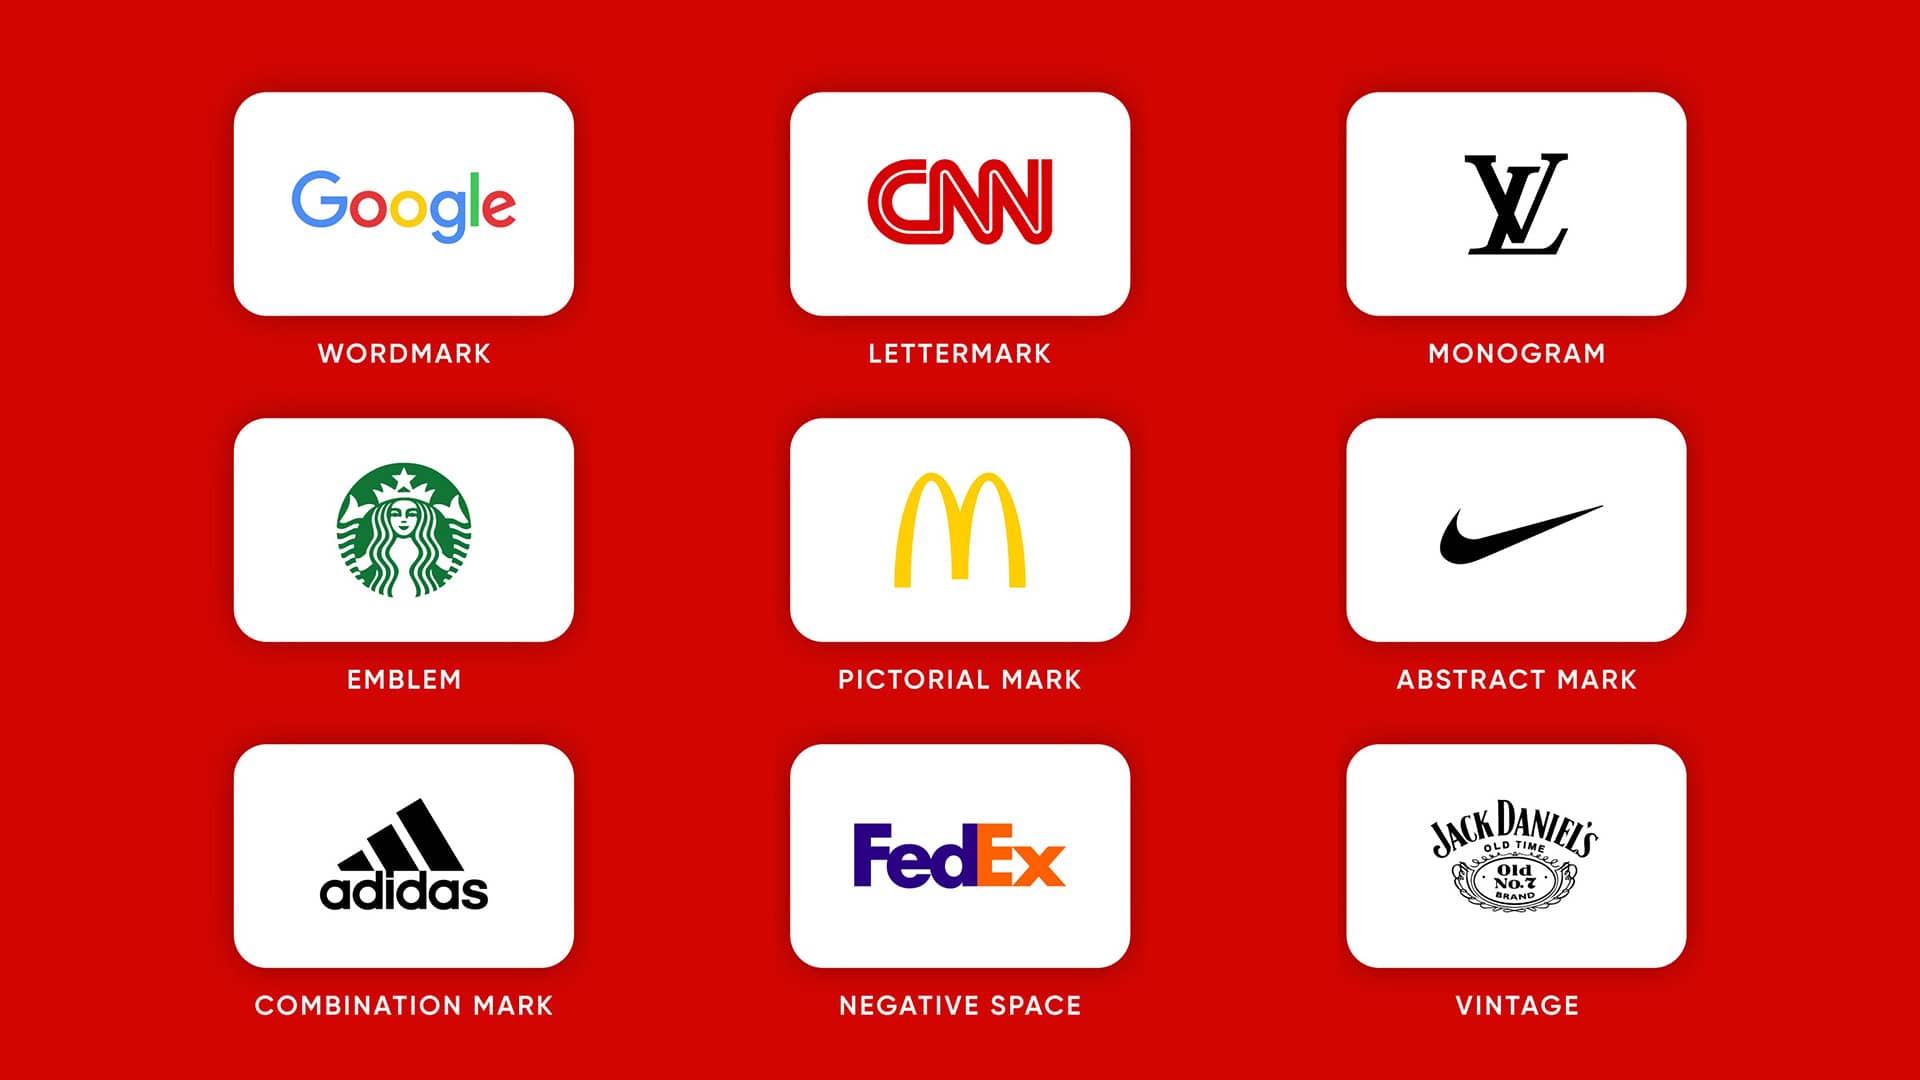
Not all logos are created equal. The structure you choose affects how a brand is read, recognized, and remembered across real-world use cases.
Below are the most common types of logos used in branding projects.
- Wordmarks rely on the company name styled in a distinctive typeface. Brands like Google and Coca-Cola are classic examples. They’re ideal for memorable names where typography carries the brand.
- Lettermarks use initials instead of the full name, like NASA and HBO. They’re ideal for long or complex names, but often need to be paired with the full name early on to build recognition.
- Abstract marks (also called brand marks) are symbols that don’t represent real-world objects, such as Pepsi and Adidas. They allow more creative freedom, but must remain simple to stay memorable.
- Pictorial marks use recognizable objects or icons, like Apple’s apple or Twitter’s bird. They create instant associations but require the symbol to be relevant to the brand.
- Mascots use illustrated characters to add personality and emotional connection. Food businesses like Wendy’s and KFC are good examples, but can be harder to reproduce consistently.
- Emblems combine text and symbols into a badge or seal, like Harley-Davidson and the older Starbucks logo. They convey tradition, but often struggle in small sizes.
- Combination marks pair text with a symbol, offering the most versatility. Brands like Target and Airbnb use them well, allowing elements to be used together or separately.
A logo type isn’t about what looks best; it’s about what serves the brand and supports long-term recognition over time.
Many logos overlap types, so consider how it will be used before designing. In most cases, the simplest choice is the smartest one.
Essential Design Principles to Master
I used to jump straight into Adobe Illustrator, spending hours adjusting shapes and line weights to produce a “professional” logo that communicated nothing.
At the time, I didn’t understand the logo design process or the principles needed to create something worth sharing.
These ideas aren’t flashy, but they’re what separate thoughtful design from surface-level work.
Sketch First, Design Later
Most beginners make the same mistake I did: opening design software before understanding what they’re actually designing.
Start with a creative brief and ask simple questions:
- What does the company do?
- Who is the audience?
- What’s the brand personality?
- What values and emotions should the logo convey?
These answers should guide every decision, from color and typography to shape and structure.
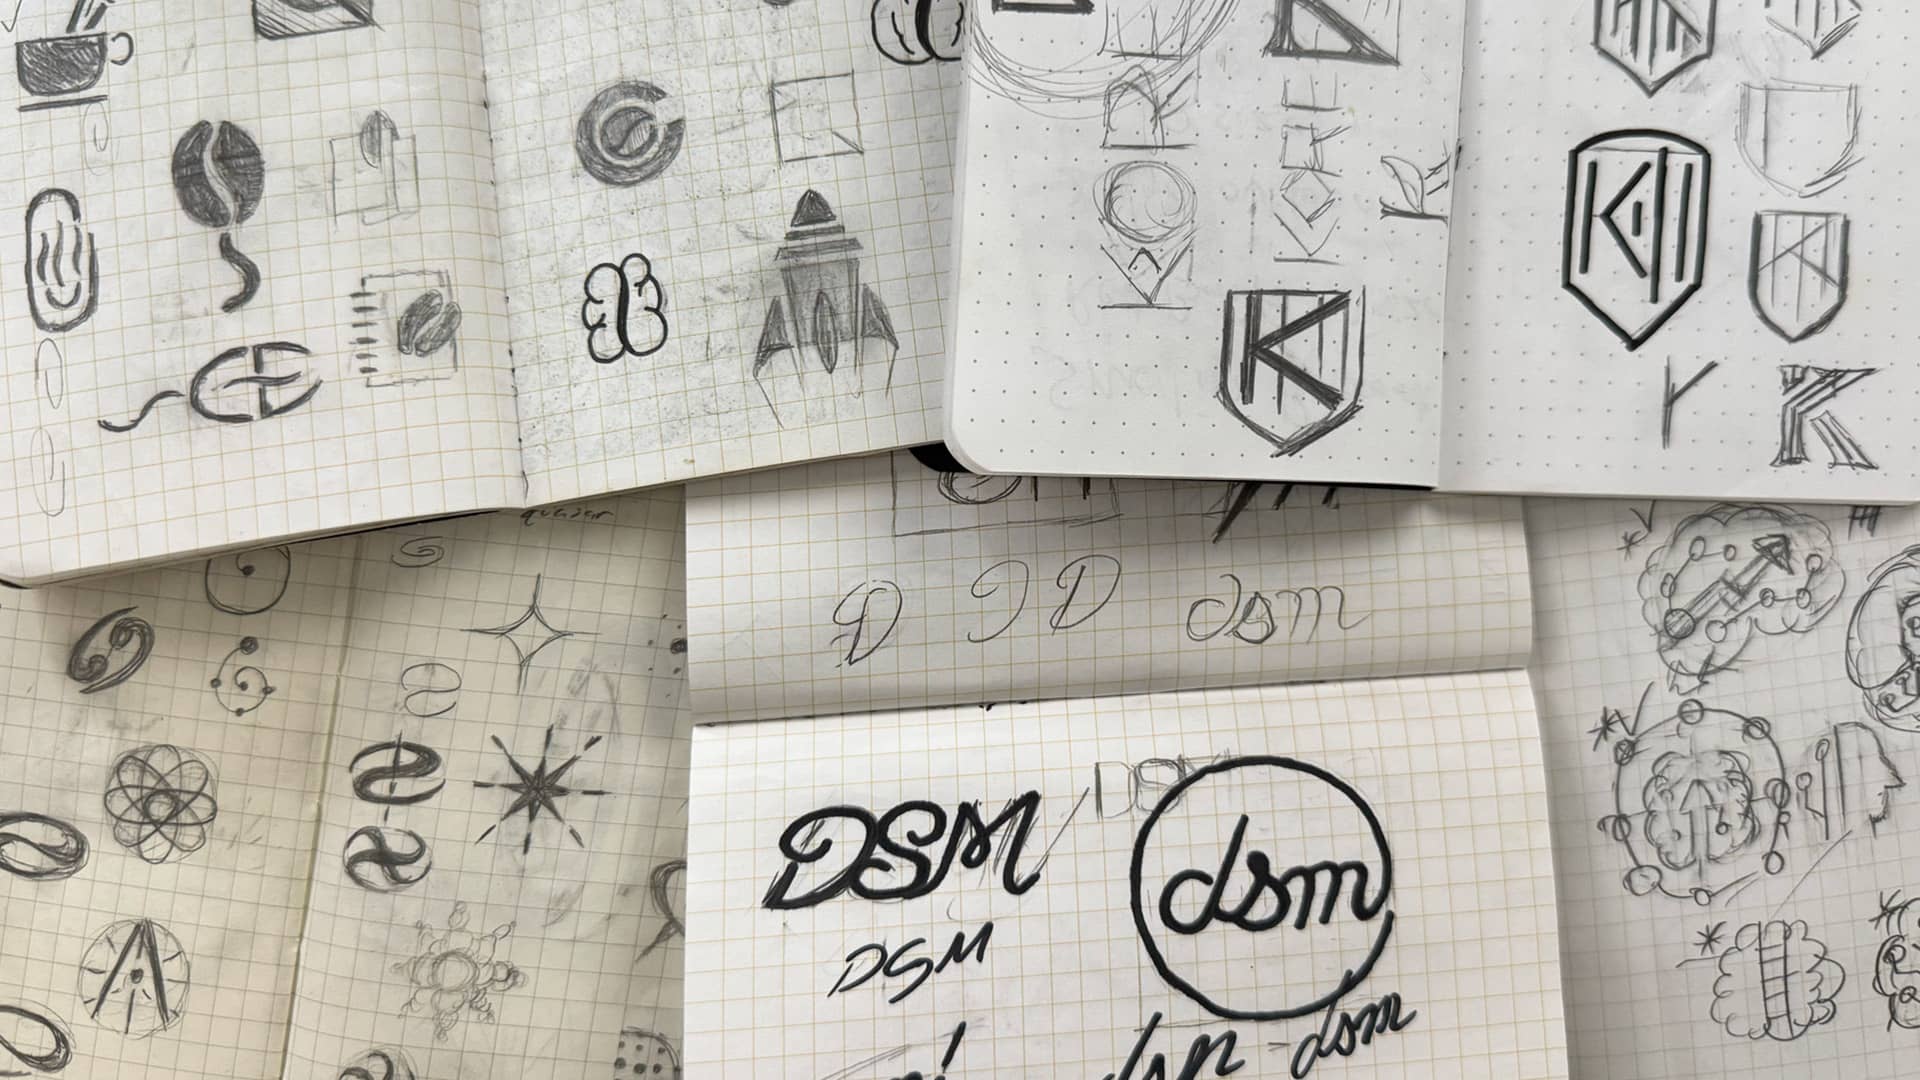
Logo sketching on paper keeps that focus on ideas instead of tools. I usually begin with rough thumbnails before refining a few strong directions.
Clients also give better feedback at this stage because ideas feel more flexible, helping avoid unnecessary redesigns later.
Simplicity is your friend, and it’s why the Apple logo remains recognizable at any size.
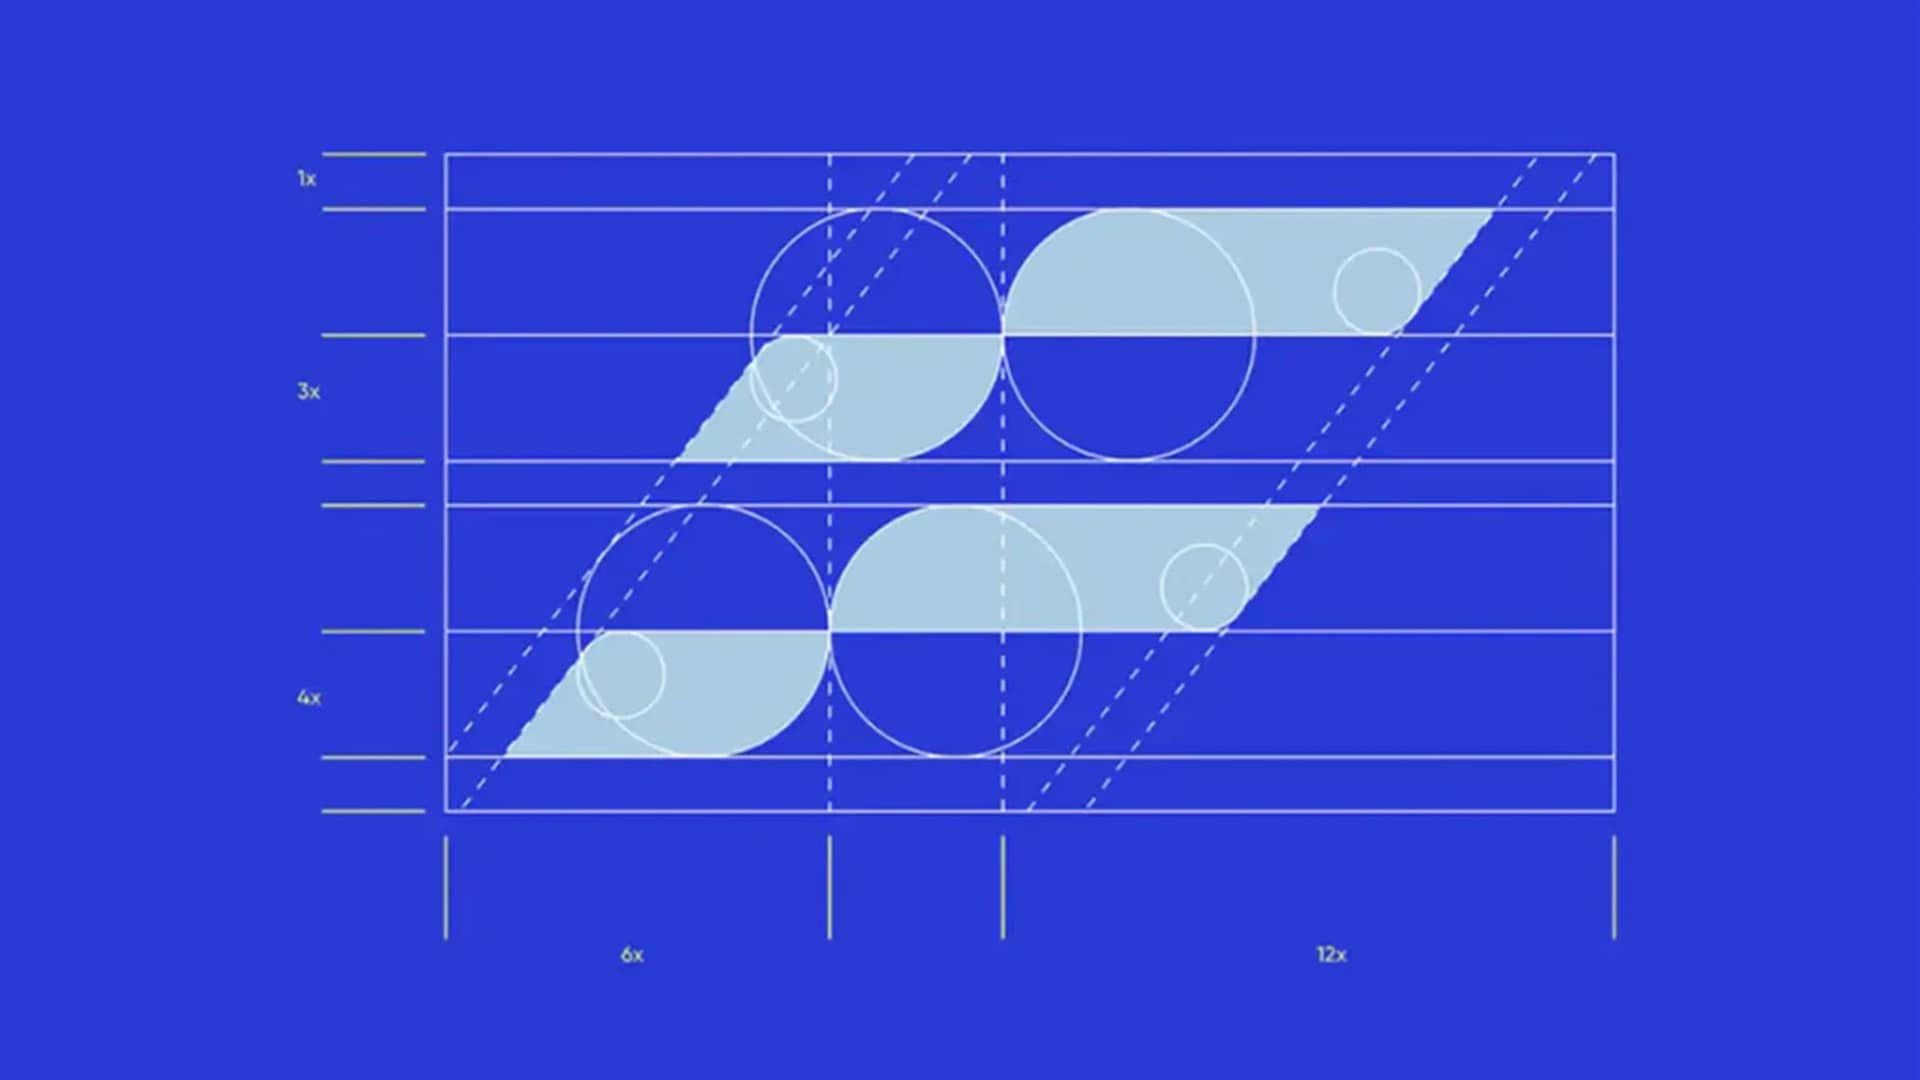
Balance, Space, and Scale
The sketching phase is fun, but once you move to the computer, structure becomes essential.
- Balance creates visual comfort. Symmetry feels stable, while asymmetry adds energy when used intentionally.
- Proportion and alignment add polish. Misaligned elements instantly make a logo feel amateur, so use grids, guides, and frequent zoom-outs.
- Negative space is often overlooked, but it improves clarity and can even carry meaning, like the hidden arrow in the FedEx logo.
- Scalability is equally important, as a logo must work everywhere, from billboards to app icons. Testing designs in black and white quickly reveals areas that need simplification.
- Hierarchy helps guide the viewer’s eye through contrast, spacing, and line weight, ensuring there’s a clear focal point.
These logo design principles aren’t meant to restrict creativity. They exist to support strong ideas and prevent small decisions from weakening good concepts.
If your logo communicates clearly, works at any size, and feels intentional rather than decorative, you’re on the right track.
Typography & Working with Fonts
When designing a logo, sketching and refining a symbol or icon to represent a brand is always rewarding.
What many beginners do, myself included at one point, is drop the company name in Helvetica or Arial and move on.
That might work for some budget-friendly projects, but when a client asks for a wordmark-only logo, beginners often panic and realize they don’t know how to make type feel distinctive.
In many cases, logo typography isn’t something you add after the idea; it’s often the idea itself.
Even logos with symbols rely on type to communicate the brand name, and weak typography can undermine an otherwise strong concept.
Choosing a Typeface
Typefaces carry personality, just like color and shape. There’s no single “best” category to use; what matters is choosing something that fits the brand.
- Serif fonts feel established and trustworthy, which is why they’re common in luxury, legal, and financial brands.
- Sans-serif fonts feel cleaner and more modern, making them popular in tech and digital products.
- Script and decorative display fonts can add personality, but they’re harder to read and easier to misuse, so they should be used sparingly.
The goal isn’t to choose a beautiful font, but one that supports the brand’s tone, audience, and industry. If you’re using more than one typeface, it’s usually best to limit it to two.
Strong contrast, such as pairing a serif with a sans-serif, creates hierarchy and makes the choice feel intentional. Subtle differences often look accidental rather than deliberate.
Like color, typography should be tested at small sizes and in black and white. If it isn’t readable without color, it isn’t strong enough.
Kerning & Tracking
Spacing is what separates amateur typography from professional work.
Default font spacing is rarely perfect for logos, so adjusting the kerning (the space between individual letters) and tracking (the overall spacing of a word) helps type feel deliberate and refined.
You don’t need fully custom lettering to stand out. Small adjustments, such as reshaping a letter, tightening key letter pairs, or modifying terminals, can turn a generic font into something distinctive.
Typography isn’t decoration; it’s structure. When type is clear, well-spaced, and aligned with the brand’s personality, the logo immediately feels more confident and professional.
Color Theory & Logo Color Schemes
I once presented a logo I thought was perfect. Unlike my earlier mistakes, this one had strong typography, solid structure, and a vibrant color palette.
The client didn’t respond well because the colors were too similar to their competitors’; something I failed to research ahead of time.
Color isn’t decoration; it’s communication. Every color carries meaning, and failing to research those associations can undermine an otherwise solid design.
Color Psychology Basics
In general, colors tend to communicate the following:
- Red signals energy and urgency.
- Orange feels vibrant and energetic.
- Yellow is optimistic and approachable.
- Green evokes growth and sustainability.
- Blue conveys trust and stability.
- Purple expresses creativity and luxury.
- Black feels sophisticated and premium.
- White communicates clarity and simplicity.
These associations are guidelines, not rules; meaning culture, audience, and execution matter just as much as the color itself.
Consider your brand personality and competitive research before choosing logo color schemes. Are you playful and expressive, or serious and restrained? Should you stand out, or intentionally blend in?
Monochromatic, or two-color logos, are often safer choices. They’re easier to reproduce, more versatile, and force strong design without relying on color alone.
Multicolor logos can be effective when color is integral to the brand’s story, as seen with Google, if each color serves a distinct purpose. If you can’t explain why it’s there, it probably isn’t needed.
Testing Color Ideas
Regardless of which direction you choose, it’s important to test your logo in black and white.
Removing color exposes structural weaknesses and ensures clarity across applications. Check grayscale versions, test contrast, and view the logo in different environments, including outdoor lighting.
Understanding context matters too, since color meanings vary by culture. Red, for example, symbolizes luck in China, but danger or urgency in much of the West.
Global brands don’t need separate logos for every market, but they do need awareness.
“Color is either friend or foe.” — Paul Rand
Tools like Adobe Color, Coolors, and Paletton help build harmonious palettes, while maintaining a color library in Illustrator ensures brand consistency across print and digital media.
Designing with future applications in mind, with RGB for digital and CMYK and Pantone for print, prevents constant adjustments and protects brand integrity.
When color is chosen with intention, your logo communicates faster, clearer, and with confidence.
Vector Graphics & Exporting Files
Early on, many beginners make the common mistake of designing a logo as a raster image, often finishing it in tools like Adobe Photoshop.
This approach may look fine on screen, but it quickly breaks down when the logo needs to be printed, embroidered, or scaled for different uses.
Logos need flexibility, and that’s only possible through vector logo design.
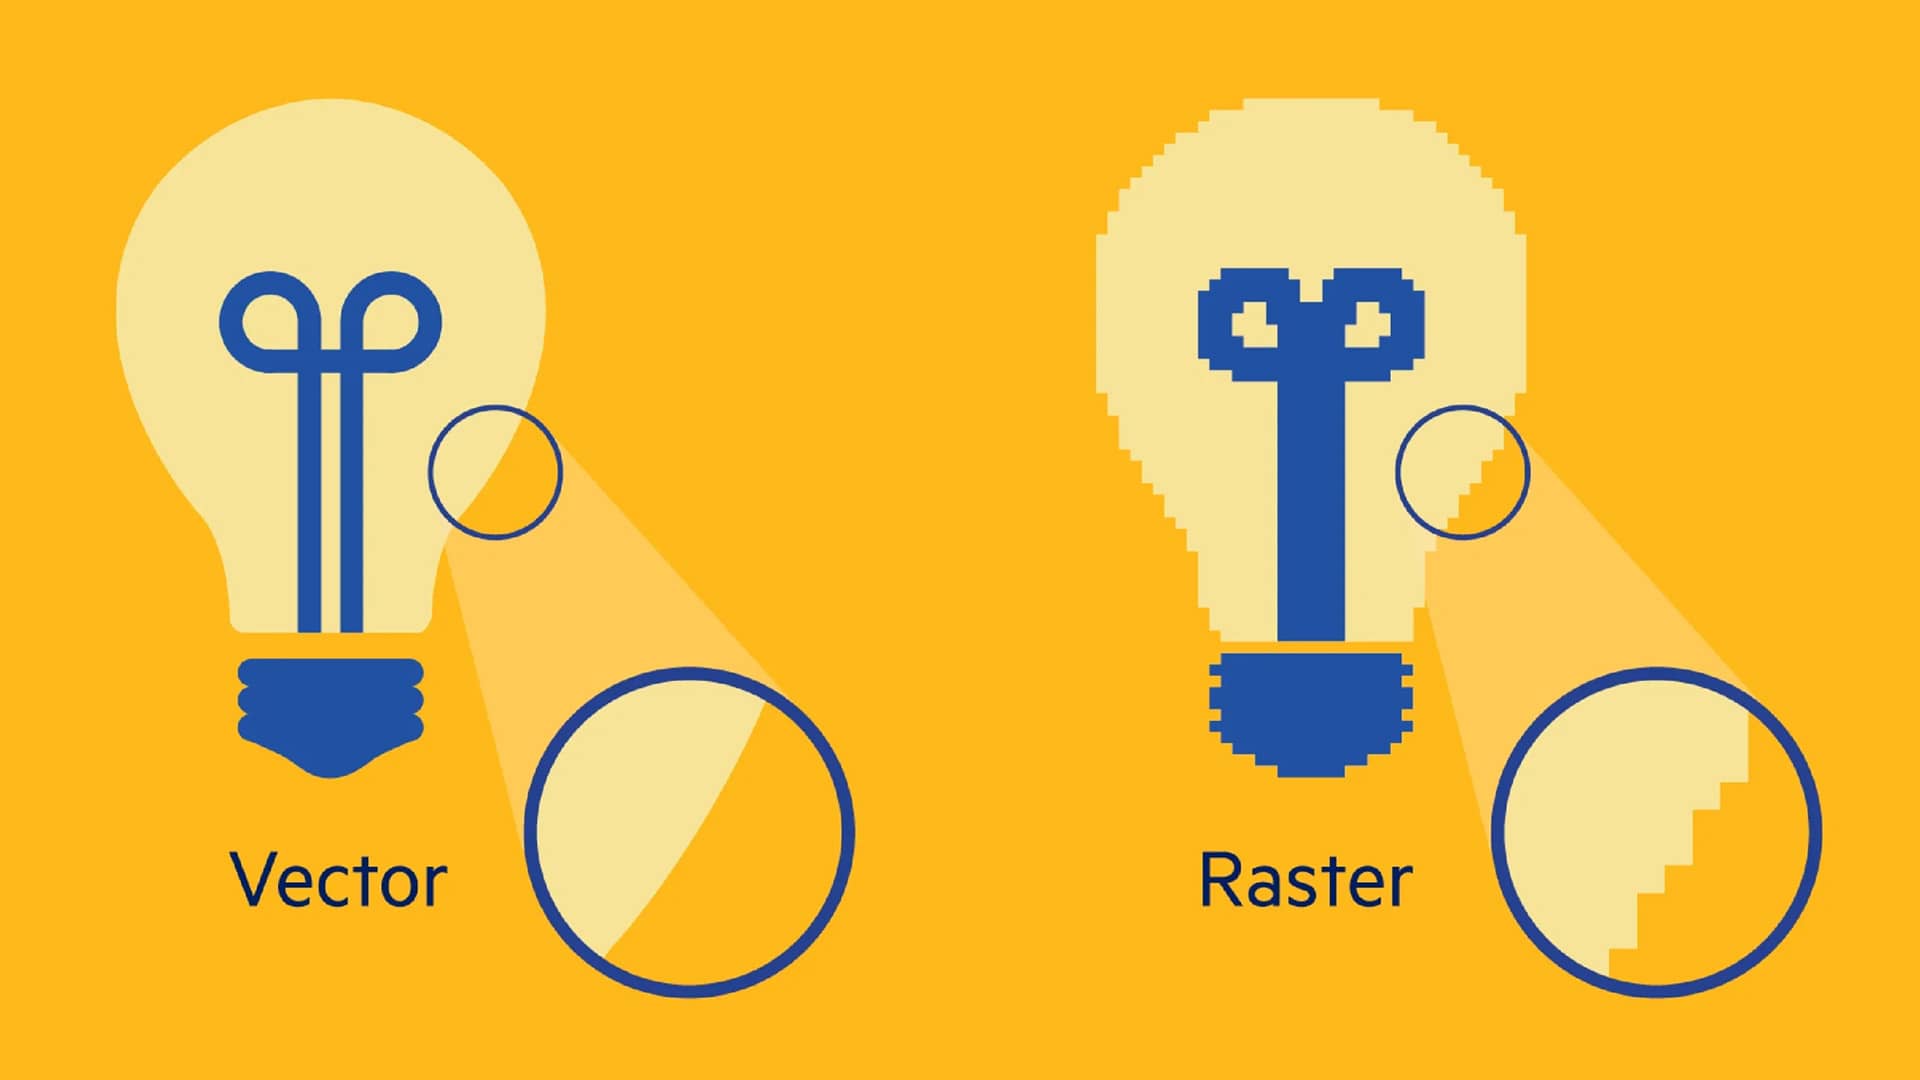
Vector vs. Raster Images
When working on screen, there are two main ways to design: raster images and vector graphics.
They may seem similar at a small scale, but raster images, made from pixels, quickly lose quality and become pixelated as they scale.
Vector graphics, built from mathematical paths and curves, don’t have this limitation. These files scale infinitely without losing sharpness, meaning a logo looks identical on a business card or a billboard.
This is why professional printers, sign makers, and manufacturers require vector files. Delivering only raster logos often leads to poor results or costly redraws later.
Logos aren’t images; they’re systems. Vector files store instructions needed to recreate the design accurately at any size.
Using Vector Software
Professional vector logo design is done in software like Adobe Illustrator, Affinity Designer, or similar tools with advanced features.
The learning curve can feel intimidating, but most logos rely on a small set of fundamentals: simple shapes, clean anchor points, path operations, and occasional use of the pen tool.
One important step is outlining text before delivery, as live fonts can break if the typeface isn’t installed on another computer, so converting text to shapes ensures consistency.
File Format Essentials
Logos are typically delivered in a mix of formats, including:
- AI is the original editable source file.
- EPS is a print-friendly vector standard.
- PDF preserves vector quality for print and sharing.
- SVG scales cleanly for web applications.
- PNG supports transparency for digital use.
- JPEG is compressed and best for quick previews.
- PSD is for mockups, not final logos.
- RAW captures unprocessed photo data, not logo assets.
Each format serves a different purpose, so clients often request multiple file types.
Vector files are always the source of truth. Raster versions should be exported from them, not the other way around.
Learning to work with vectors may feel slow at first, but it’s non-negotiable for professional logo design. Precision, scalability, and professionalism all start here.
Choosing the Right Tools to Design
When I first started my career, I designed logos using the wrong tools simply because they were familiar.
At the time, I relied on raster-based software like Photoshop CS2 from the early 2000s and didn’t fully understand why my logos broke down when resized or printed.
Once I understood this problem and switched to vector software, the quality, flexibility, and professionalism of my work improved almost overnight.
The tools you use won’t make you a good designer, but they do determine what’s possible.
Popular Design Software
Designing a logo requires precision, scalability, and clean file output, which is why vector-based tools are essential for serious logo work.
Below is a practical breakdown of the most common options and where each one makes sense.
- Adobe Illustrator is the industry standard for design, offering precise control, advanced typography, and reliable print compatibility. An expensive subscription, but the most dependable choice.
- Affinity Designer offers a strong Illustrator alternative with a one-time purchase. It handles most logo design needs well, though it lacks some industry-standard workflows and ecosystem compatibility.
- Inkscape is a free, open-source vector editor. Powerful, but less refined, with more friction in professional workflows and file delivery.
- Canva is fast and accessible, yet heavily template-driven. Useful for quick mockups or early ideas, but not for professional logos or scalable brand systems.
- Kittl is a browser-based design tool focused on logos and typography. Easier than Illustrator and more flexible than Canva, but limited for complex or technical vector work.
- Figma functions primarily as a UI and collaboration tool. While it can handle basic vector work, it’s better suited for brand systems and logo style guides than logo design.
- Procreate excels at sketching, illustration, and hand-drawn concepts on the iPad. A strong starting point, but never for a final logo design tool.
Choosing the right software depends on your goals, budget, and stage of growth. It’s fine to start with what you have, then move toward proper vector tools as your skills develop.
Feel free to check out some of the tools and resources I use for my work.
Strong logos come from good design thinking, but choosing the right tools ensures those ideas hold up in the real world.
Testing & Refining Your Concepts
When designing a logo, it’s easy to spend weeks refining details while missing deeper flaws. I learned this early on after presenting a logo I loved, only to realize the client didn’t understand it at all.
A logo’s success isn’t defined by how clever or precise it is, but by how clearly it communicates.
Testing isn’t optional. It’s how you close the gap between intention and perception, and it’s a critical part of the logo design process.
Testing for Weaknesses
Before asking for feedback, a logo should pass a few essential tests. These aren’t opinions; they’re functional checks that reveal whether the design works.
Start by viewing the logo at a small size. If it loses clarity or its core shape, it’s likely too complex. A strong logo should remain recognizable as a favicon, app icon, or social avatar.
Next, test it in black and white. Removing color exposes issues with contrast, hierarchy, and form. If the logo relies on color to work, the structure needs refinement.
Finally, place the logo in real-world contexts, like a website header, business card, or social post. Mockups quickly reveal spacing, balance, and proportion issues that aren’t obvious on a blank artboard.
If the logo fails any of these tests, refine it before sharing with anyone, especially a client. Feedback isn’t useful if the design doesn’t function in its intended use.
Asking for Feedback
Once a logo passes these checks, feedback becomes valuable. At this stage, you’re no longer asking whether it works, but whether it communicates the right message.
Be selective, as too many opinions can dilute your direction and create confusion. Focus on clients, stakeholders familiar with the brand, or designers whose judgment you trust.
Avoid vague questions like “Do you like it?” Instead, ask specific ones like:
- Does this feel appropriate for the brand?
- What emotion does it communicate?
- Does anything feel unclear or distracting?
Look for patterns rather than reacting to every comment. Repeated concerns are worth addressing, while feedback that conflicts with the brief may be acknowledged without acting on it.
Knowing when a logo is finished is one of the hardest skills to develop. It doesn’t need to be perfect, but it should feel intentional, functional, and aligned with the brand.
A finished logo isn’t the one with the most tweaks; it’s the one that holds up under testing and communicates clearly without explanation.
Creating Logos That Work Everywhere
As creatives, it’s easy to get stuck in the fidgeting phase, knowing a logo is nearly complete, yet spending hours adjusting anchor points.
While this stage often lasts longer than it should, precision and execution still matter before a logo is introduced beyond the artboard.
A logo isn’t finished until it works everywhere it needs to live. If thin lines disappear or gradients break down at different sizes, it isn’t ready.
Real-World Applications
Logos live far beyond websites and social media. They appear on business cards, packaging, signage, apparel, and promotional items, each with different limitations.
Embroidery can’t reproduce fine detail, printing may restrict color, small applications like app icons or pens demand extreme simplicity, and large signage requires clarity from a distance.
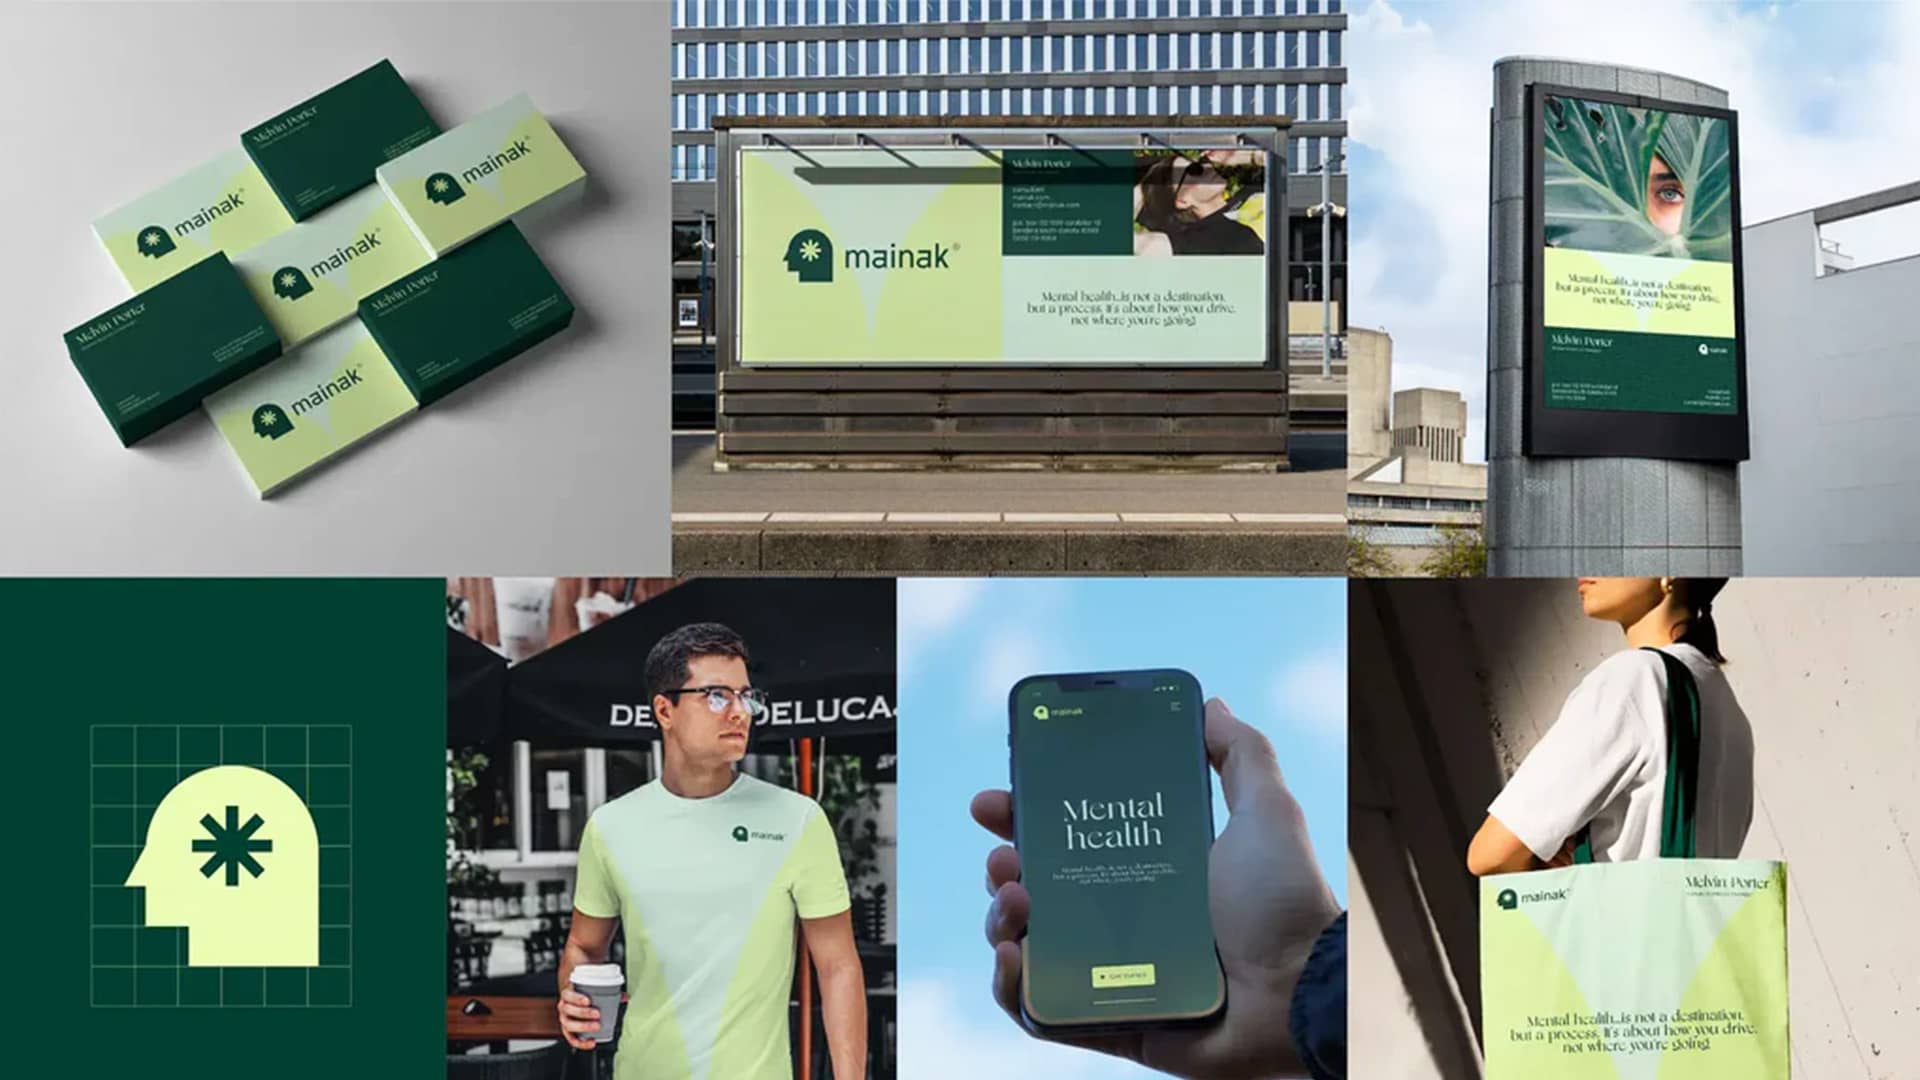
A helpful habit is defining these extremes early in the logo design process. Understanding where the logo will live, the size constraints of each application, and where alternate versions may be needed.
Most brands require more than one logo variation: a primary mark for standard use, a simplified version for tight spaces, and often an icon or symbol for very small applications.
This isn’t about creating multiple logos; it’s about building flexibility into a single identity.
Creating a Style Guide
Once a logo is finalized and delivered, it needs structure to survive in the real world. This is where a logo style guide (also called brand guidelines) becomes essential.
At a minimum, guidelines should define approved logo versions, color usage, minimum sizes, clear space, and common mistakes to avoid.
These rules protect the logo’s integrity and ensure brand consistency long after handoff.
“A logo without guidelines isn’t a system: it’s a suggestion.” — Michael Bierut
Intentional logo variations should also be clearly documented, including full-color, black, white, and one-color versions.
This ensures legibility across light and dark backgrounds, limited-color printing, and specialty applications like engraving or embossing.
A professional logo isn’t just attractive; it’s resilient. When it works across different sizes, formats, and real-world applications, it becomes a reliable foundation for the entire brand identity design.
This can be seen across my design projects.
Common Mistakes & Breaking Habits
I used to believe a logo’s success was mostly visual. If it looked clean, modern, and balanced on the artboard, it felt complete.
Many beginners fall into this same trap, often focusing on style before structure and mistaking decoration for clarity.
But logos must work across platforms and communicate clearly everywhere they appear.
Design decisions extend beyond the screen. Printing, production, implementation costs, and the client’s budget all depend on how practical the logo is.
Mistakes to Avoid
Strong logos rely on communication, not visual noise, so catching common logo design mistakes early prevents costly revisions later.
- Overdesigning the concept to communicate too many ideas at once weakens a logo. Strong marks focus on a single, clear idea supported by intentional type and spacing.
- Relying on visual effects like gradients, shadows, and textures often hides weak form. A solid logo should work in pure black and white without falling apart.
- Designing without context hurts a logo. Thin strokes disappear, details collapse, and wide layouts fail without real-world testing.
- Ignoring spacing and alignment weakens strong logos. Poor kerning, tracking, and inconsistent alignment make otherwise good ideas feel careless.
- Presenting only one direction and showing a single concept limits discussion. Multiple directions provide context and lead to more productive feedback.
- Skipping brand guidelines gives a logo too much freedom. Without usage rules, brand consistency breaks down quickly. Logos need clear guidance to function as part of a system.
- Giving up design rights without clear ownership and licensing can create problems later. Defined terms in a written agreement or contract protect both the designer and the client.
These mistakes are common early on, and most designers encounter them at some point, but recognizing them improves outcomes, speeds up your workflow, and reduces unnecessary revisions.
Strong logos aren’t about perfection; they’re about clarity, intention, and restraint in every decision.
Drawing Inspiration Without Copying
One of my worst mistakes happened while designing a logo for a local sushi restaurant.
I found what felt like the perfect reference online and convinced myself that tweaking the colors and curves would make it unique.
Two weeks after launch, the original designer recognized it immediately.
While he wasn’t angry, it did teach me how closely inspiration and plagiarism can blur during research.
Finding Inspiration
There’s no shortage of places to find inspiration today. Platforms like Behance, Dribbble, and Pinterest make it extremely easy to find references that support your projects.
Even Brand New makes it easy to study design cases and strategies.
Too much exposure, however, often leads to unconscious copying or creative paralysis.
Borrowing a general idea, feeling, or technique and expressing it in your own way is inspiration, while recreating specific shapes, layouts, or letterforms is plagiarism.
Placing your work side-by-side with references helps reveal this quickly; if they look similar, it’s probably too close.
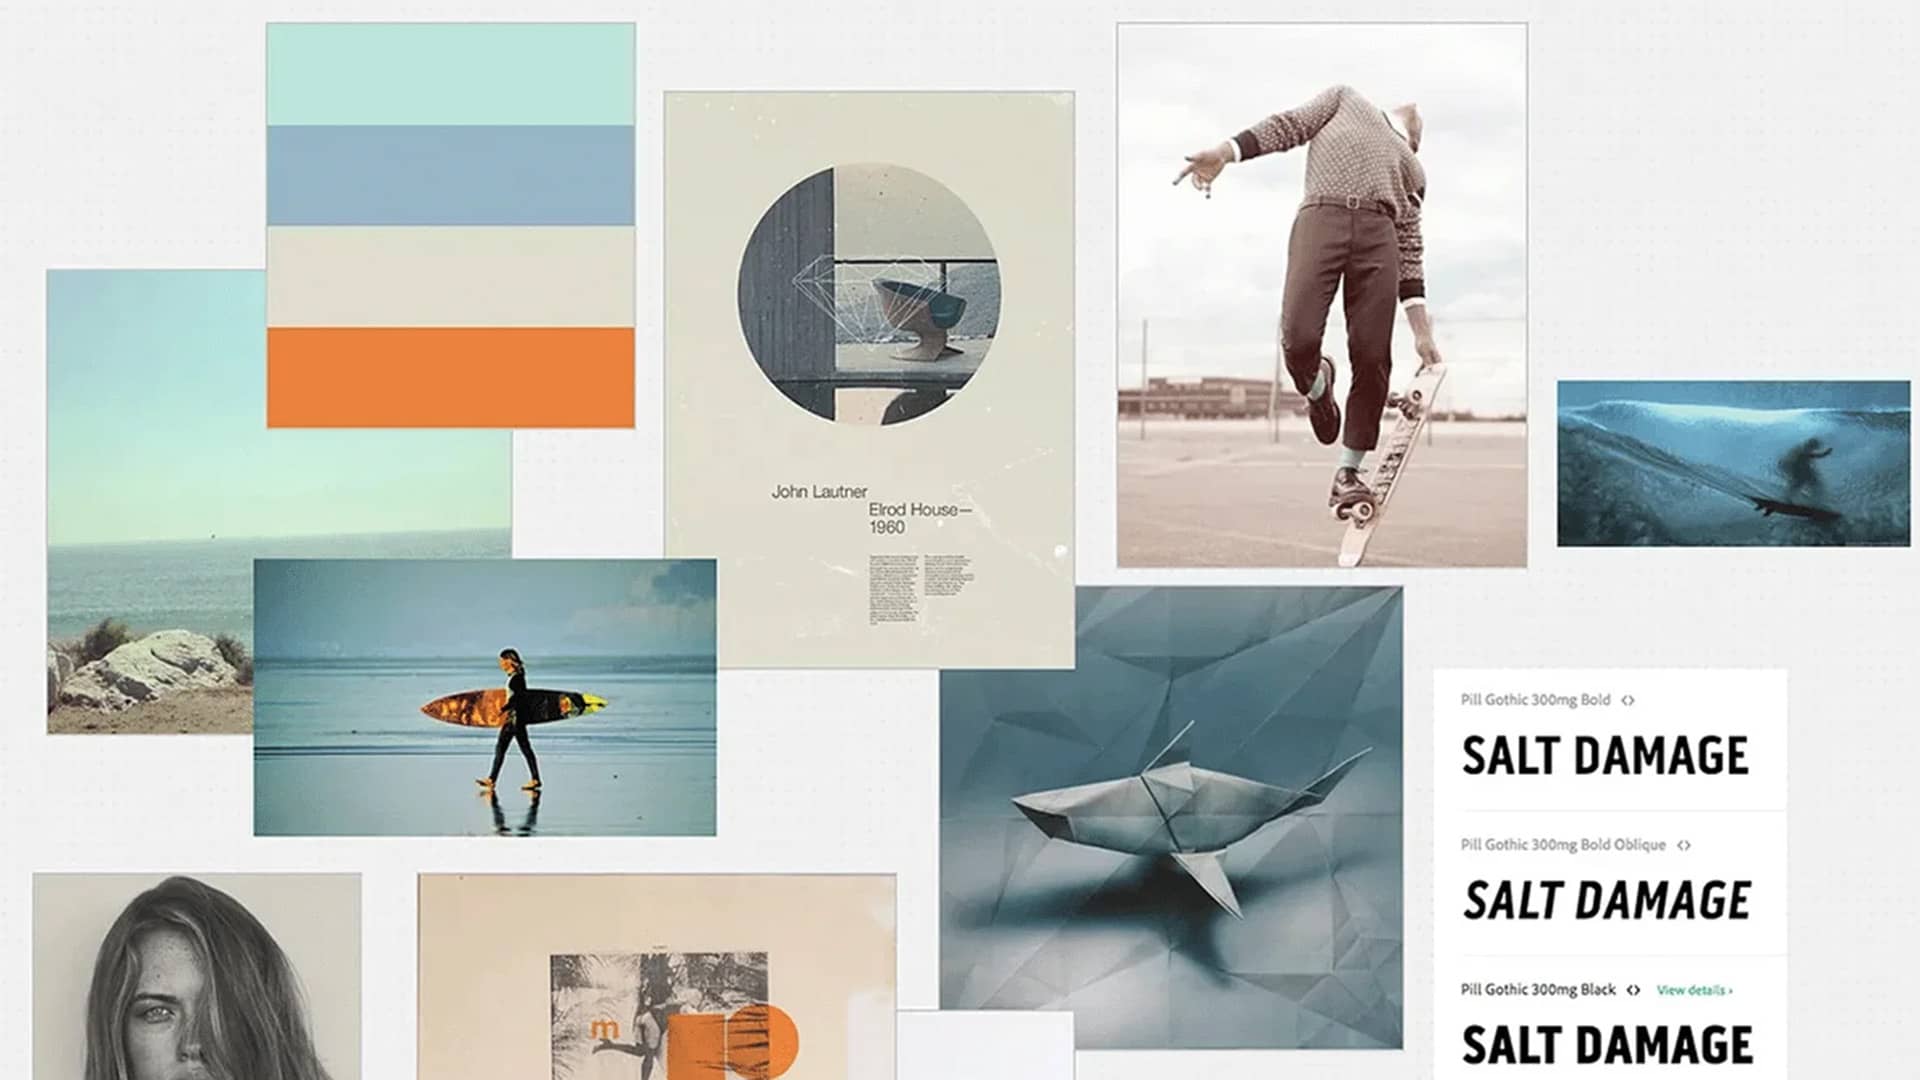
Competitive research and mood boards are especially useful because they define tone and direction early, often leading to more original outcomes.
Understanding Copyright
Legally speaking, ideas aren’t protected, but execution is. You can’t copyright “a mountain logo,” but you can copyright a specific mountain design.
Even stock graphics carry licenses and usage restrictions if used without heavy modification.
Inspiration should push you to create, not replicate. Copying may feel harmless in the moment, but it eventually catches up with your reputation and confidence as a designer.
Building & Developing Design Skills
While logo design has its rewards, nobody starts out creating perfect logos. I certainly didn’t.
My early logos were overworked, awkward, and inconsistent; not because I lacked taste, but because I lacked experience.
There’s a big gap between recognizing good design and being able to create it yourself. The only way to close it is consistent practice paired with honest feedback.
Progress doesn’t come from inspiration or theory alone. It comes from repetition.
Daily Practice Habits
The more you design, the more fundamentals like spacing, hierarchy, and restraint become intuitive, turning guesswork into confident decisions.
Most practice work won’t be good, and that’s normal, since the goal isn’t to create portfolio pieces or award-winning projects every time.
Logo sketching, refining typography, simplifying shapes, and testing logos at small sizes all contribute to long-term improvement. Even 30 minutes a day adds up if the focus is clear.
Creative Constraints
Sometimes working with fictional brands or redesigning existing logos can remove pressure and encourage experimentation, where much of the learning happens.
Working with constraints also trains creativity, mirroring the challenges clients often face, like color limits, small-scale applications, and brand consistency.
Over time, progress comes from recognizing the same problems and knowing how to solve them.
Learning From Others
Studying existing logos is just as important as creating new ones, not through passive scrolling, but by actively analyzing why something works.
Books, case studies, courses, and tutorials are valuable references, but they don’t replace real practice.
Sharing work with trusted peers or design communities can also reveal blind spots you might miss. This helps identify patterns in group feedback rather than focusing on individual opinions.
Good logo design takes time, measured in years, not weeks. If you show up regularly, study with intent, and stay open to critique, improvement becomes inevitable.
Conclusion: Putting It All Together
Designing your first logo can feel intimidating, but it doesn’t have to be. Every strong logo you admire comes from repeated trial, refinement, and lessons learned along the way.
Throughout this guide, we focused on the fundamentals that matter most: clear concepts, strong structure, thoughtful typography, intentional color, and real-world usability.
Even as tools, trends, and styles change, these principles will always remain consistent.
“Design is thinking made visible.” — Saul Bass
Simple logos that work in practice always outperform clever ideas that fall apart, so keep practicing, stay curious, and let the work evolve. That’s how real improvement happens.
Logo design is a skill built through repetition. You won’t improve by waiting for inspiration; you improve by sketching, testing, exporting, breaking things, and fixing them.
The goal isn’t perfection, it’s progress.
Thanks for reading,
William